,lexia 3,ca n clip
get obd2 diagnostic tools - diyobd2.fr,lexia 3,ca n clip
get obd2 diagnostic tools - diyobd2.frHow to rework ICOM A2 with heatsink for Cooling chips
This is a great solution of ICOM A2 reworkwith a heatsink which is cooling both chips.
(GREAT THANKS to B1257)
Now here are some pictures about the heatsink I made.

Picture1 As you can see in my way the heatsink is made with two parts. The main center plate which will later touch the complete case for a better heat dissipation. And second the small CPU plate which is glued with a special Thermal Bound paste for FPGA chips on the center plate. You can see the compound type on the picture.

Picture2 Shows the Temp in C° after an idle running time of the head about 30 minutes, without any cooling.

Picture3 Original there are two pads for the cooling, but not one is touching the case, after a longer time the complete case will warm up in a way that the both chips are near out of max temp range, which is in a normal grade about 70°C. For our heatsink I will use a small pad for the MICREL chip to give me the right contact to my center plate. Second reason is that the pad gives me a little bit place for a realignment to center the main plate with both chips.

Picture4 You can see new srewls and bolts to compensate the new height. The screwls dimension of the innerside srewls is 2.5x12mm (countersunk bolt, this is important, because we cant fix the center place in the case if there is not enough place with normal screwls.)

Picture5 Be careful to center the plate exactly with vary the three plastic bolts, may you have to cut it a little bit. Check the space between the case and the center plate one or more times. Take care that both chips are touching the heatsink, because some cases can vary the height.

Picture6 Apply compound paste to the center plate, where the heatsink is later touching the case for the best heat dissipation.

Picture7 For the best way take care that the complete heatsink is touching the case. See the red arrow.
After the heatsink mod the temps are always inside the specs. I remember 5 hours idle running about 40.5C° room temp about 26°C.
Attachment:
Heatsink Dimension PDF overview
Sketup File
I hope this helps you to mount the heatsink in a proper way.
So advice to all -
To avoid issues, please check the PCB design (with the cooling plate) before your buying. when buying from China, it seems diyobd2.fr is one of the safest way to make sure of things quality.

This is their ICOM A2 pcb with a cooling plate
(BIG THANKS to B1257 in http://cartechnology.co.uk/)
Original - from diyobd2.fr obd2 francais service technique:How to rework ICOM A2 with heatsink for Cooling chips
Rapporter l'article:
bmw icom francais
French 2015.07V Wifi BMW ICOM A2 Diagnostic and Programming Tool – All inform here
2015.7 software version:
ISTA-D: 3.49.30
ISTA-P: 55.4.000
VIN: 2015.05
Latest ICOM Firmware version:
Current package image version: 03.14.03
Current system image version: 01.25.02
Download free at:
http://www.chinaautodiag.com/download/icom-application-image-01-40-05-bootimage-01-25-02.zip
BMW ICOM A2 firmware upgrade video:
Feature:
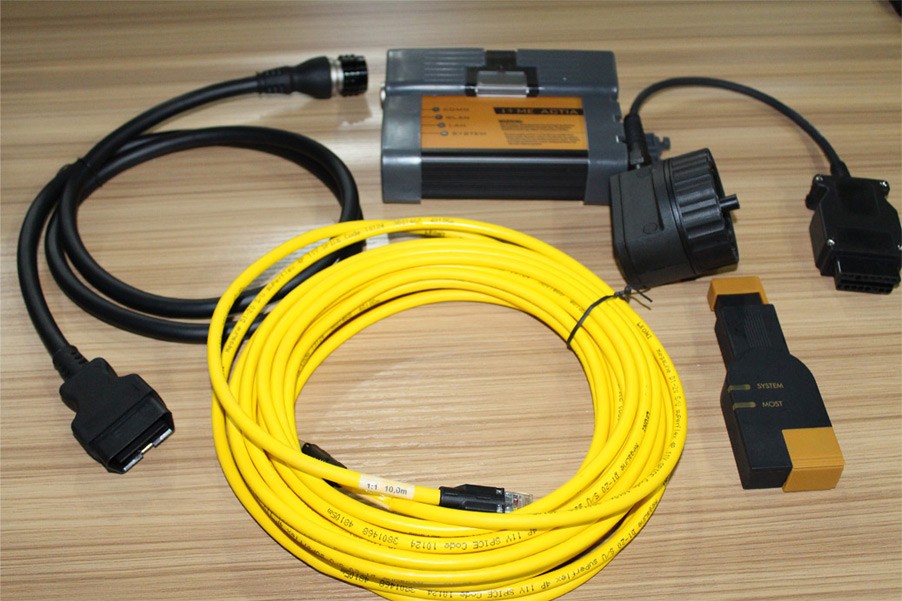
BMW ICOM A2 Diagnostic & Programming Tool is equipped with WIFI and a router.
ICOM A2 supports a new feature Intel Graphics adapter.
Language available:
ICOM A2 supports multi-language load diagnosis and programming, as TIS scheme:
American, British English, German, Spanish, French, Italian, Polish, Portuguese, Turkish, Czech, Swedish, Dutch, Indian, Greek, Russian, Simplified Chinese , Traditional Chinese, Japanese, Korean and Thai.
Computer requirements:
1. Support more than 95% laptop with Intel chip (series I3 / I5 / I7), dual-core processor.
2. More memory 4G
3. You are recommended to use Lenovo ThinkPad T61, T400, T410, T420, T430, X61, X200, X201, X220, X230 2015.7 ICOM A2 + B + C compared with ICOM in BMW special function:
1. ICOM A2 modified for vehicles with OBD access receives a much more powerful processor and more storage capacity.
2. Robust aluminum case will help prevent damage during use in harsh environments.
3. To protect the MOST connector, ICOM B for vehicles as optical access will be equipped with a flexible rubber cover instead of the old plastic cap.
4. ICOM C for old series with a diagnostic socket is further provided with an approx. 20 cm of cable length, which facilitates the connection of the ICOM A2 and makes storage in easier engine compartment.
5. ICOM A2 + B + C To support BMW BMW cars until years 2013. It supports BMW and MINI complete system diagnostic and offline programming.

ICOM A2 2015.7 Wifi settings:
1. First insert the usb wifi usb port on pc
2. Disable all wifi on the PC, the PC is our usb wifi equipment. Do not connect to the network equipment or network cable.
3. More determined to do, then start the PC.
4. After starting PC vvérifier again if all wireless network are turned off and disconnected network cable.
5. Run the software and choose “WiFi for ICOM”
6. ICOM connect to the vehicle, wait 20-60 seconds, you will see the WLAN LED is not flashing or blinking slowly.


7. You can now point the diagnostic software or programming Click ok, this page can not close, only minimized.


This is from OBD2 Francais website technical support: French 2015.07V Wifi BMW ICOM A2 Diagnostic and Programming Tool – All inform here
How to use ICOM A2 NCS Expert for BMW customer sight settings
Customer complaint:
I installed LED on my E60 Angle Lamp - and it comes out with this error:
Side/daytime lights on left faulty
Side/daytime lights on right faulty
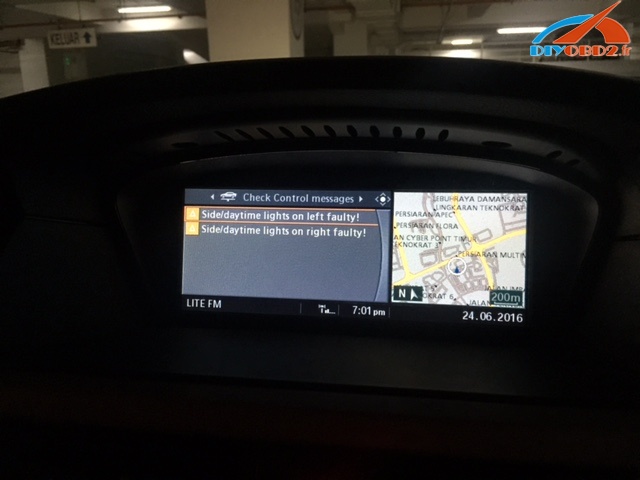
anyway to get rid of it? I have ICOM A2 emulator & ISTA.
Suggestion from diyobd2 engineers and real users:
diyobd2 engineers:
You must code LMA module with NCSexpert and NCSDummy(easier)
Turn to "nicht_aktiv" option for kalt and warm monitoring, and CC Fehler for standlicht or TFL
real users:
Here goes the dummy guide to do custom Light settings - coding E60, E63, E90 LMA module using NCS Expert
You need BMW ICOM A2 emulator with working NCS Expert
Note 1:
changes are to be made in the LMA module using NCS Expert, with the E90 you need to make these changes in the FRM module
Note 2:
some of these changes are only possible for cars with a build date after 03/2007, but you can retrofit a new module to earlier cars if you really want the features
Note 3:
I have marked the setting I used with a star =*.
Quote:
WELCOME_LIGHT_ACTIVE WELCOME LIGHTS IN LIGHTS MENU (LINKED TO [VA_WELCOMELIGHT] IN CAPPL) aktiv enabled * nicht_aktiv not enabled WL_SL_1 WELCOME LIGHTS WITH STANDING LIGHTS 1 nicht_aktiv not enabled soft_einschalten soft-on * hart_einschalten direct switch-on WL_KZL WELCOME LIGHTS WITH LICENSE PLATE LIGHTS nicht_aktiv not enabled soft_einschalten soft-on * hart_einschalten direct switch-on DEF_WELCOMELIGHT_CKM DEFAULT CAR/KEY MEMORY FOR WELCOME LIGHTS nicht_aktiv not enabled aktiv enabled * WELCOMELIGHT_CKM_0 CAR/KEY MEMORY 1 FOR WELCOME LIGHTS nicht_aktiv not enabled aktiv enabled * WELCOMELIGHT_CKM_1 CAR/KEY MEMORY 2 FOR WELCOME LIGHTS nicht_aktiv not enabled aktiv enabled * WELCOMELIGHT_CKM_2 CAR/KEY MEMORY 3 FOR WELCOME LIGHTS nicht_aktiv not enabled aktiv enabled * WELCOMELIGHT_CKM_3 CAR/KEY MEMORY 4 FOR WELCOME LIGHTS nicht_aktiv not enabled aktiv enabled * WELCOME_LIGHT_ACTIVE WELCOME LIGHTS IN LIGHTS MENU (LINKED TO [VA_WELCOMELIGHT] IN CAPPL) aktiv enabled * nicht_aktiv not enabled (Requires newer SW version in CAPPL/MASK than I had) |
Quote:
HEIMLEUCHTEN_FUNKSCHL FOLLOW-ME-HOME LIGHTS ACTIVATED BY LOCKING WITH REMOTE CONTROL nicht_aktiv not enabled aktiv enabled * Also change this parameter on CAS Module: Module: CAS: Parameter: SONDERTASTE_PANIKALARM New Value: panikalarm * (will be « nicht_aktiv » by default) |
Quote:
BFD_2_ALGORITHMUS BRAKE FORCE DISPLAY STAGE 2 ALGORITHM nicht_aktiv not enabled aktiv enabled * BFD_2_BL_M_ERSCH_BILD BRAKE FORCE DISPLAY STAGE 1 THIRD BRAKE LIGHT APPEARANCE [NICHT_AKTIV: OFF, WERT_01: ON, WERT_03: FLASHING] nicht_aktiv not enabled wert_01 value 01 wert_02 value 01 wert_03 value 03 * (flashing) |
Quote:
KLS_BEI_AL_AKTIV CORNERING LIGHTS ENABLED WHEN LIGHT SWITCH SET TO LOW BEAMS nicht_aktiv not enabled aktiv enabled * ABSTELLPOS_SMC SWITCH-OFF CORNERING LIGHTS WHEN STEERING WHEEL RETURNS (LIKE TURN SIGNALS) nicht_aktiv not enabled aktiv enabled * DEF_ABBIEGELICHT_CKM DEFAULT CAR/KEY MEMORY FOR CORNERING LIGHTS nicht_aktiv not enabled aktiv enabled * |
Angel Eyes as DRLs
Quote:
VERHALTEN_DRL_TFL_33 DAYTIME RUNNING LIGHTS drl_tfl_off daytime running lights disabled drl_s usa daytime running lights with dedicated lights drl_h usa daytime running lights with high beams drl_l usa daytime running lights with low beams tfl_s * european daytime running lights with dedicated lights DRL_TFL_SML_33 DAYTIME RUNNING LIGHTS WITH SIDE MARKER LIGHTS nicht_aktiv not enabled aktiv * enabled The DRL also needs a change in the M-ASK or CCC: DAY_RUN_LIGHT nicht_aktiv aktiv * This is from OBD2 Francais website technical support:How to use ICOM A2 NCS Expert for BMW customer sight settings |
How to run ISTA-P with K+DCAN cable using ICOM A2
This is the instruction on how to run Rheingold ista / p with K + Dcan USB cable using BMW ICOM A2 diagnostic tool.


1.Disable firewall.
2.Remove voltage constant.
3.Extract and copy the ICOM emulator xml files to:
*: \ Apps \ wsm \ apps \ agent \ data \
4. In VMware network editor, ensure "VMnet0" is set to "bridged" and your LAN network adaptor is selected in the drop down menu.
5. In VMware network editor, add a new network called "VMnet3" and set it up as shown in the picture below:
Note: Click "apply" and "ok" and close down VMware.
6. Open VMware again and start emulator using the k + dcan snapshot. Once it has loaded up, go to the vm settings and change network adaptor 1 to "VMnet3 (host only)". Click "ok" then wait 30 seconds for network to re-initialise.
note: you can now create new snapshot if you want.
7. Connect K + Dcan cable to emulator and car and run "Ifhsrv32" using icon on desktop emulator.
note: ensure k + dcan cable usb icon is active in the vm.
8. Start ISTAP native, start a session and choose "ICOM emulator" in connection manager screen.
note: if everything is ok, the led on your cable should start to flash after a minute or so. If not, recheck emulator settings (ie com9, latency timer set to 1 etc.).
Ceci est du site Web du support technique Www.diyobd2.fr : Comment faire avec câble pour Executer ISTA P K + Dcan Utilisant ICOM A2