,lexia 3,ca n clip
get obd2 diagnostic tools - diyobd2.fr,lexia 3,ca n clip
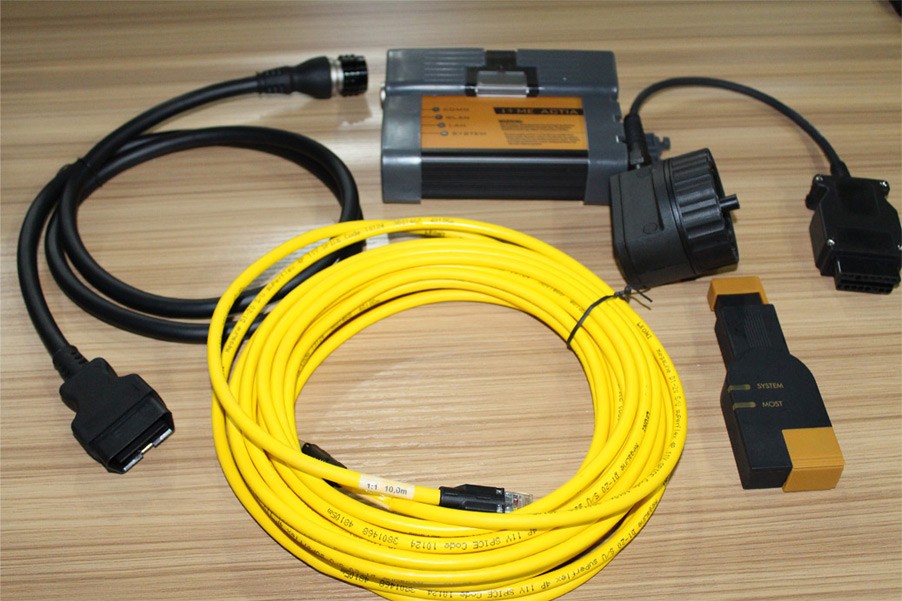
get obd2 diagnostic tools - diyobd2.frFrench 2015.07V Wifi BMW ICOM A2 Diagnostic and Programming Tool – All inform here
2015.7 software version:
ISTA-D: 3.49.30
ISTA-P: 55.4.000
VIN: 2015.05
Latest ICOM Firmware version:
Current package image version: 03.14.03
Current system image version: 01.25.02
Download free at:
http://www.chinaautodiag.com/download/icom-application-image-01-40-05-bootimage-01-25-02.zip
BMW ICOM A2 firmware upgrade video:
Feature:
BMW ICOM A2 Diagnostic & Programming Tool is equipped with WIFI and a router.
ICOM A2 supports a new feature Intel Graphics adapter.
Language available:
ICOM A2 supports multi-language load diagnosis and programming, as TIS scheme:
American, British English, German, Spanish, French, Italian, Polish, Portuguese, Turkish, Czech, Swedish, Dutch, Indian, Greek, Russian, Simplified Chinese , Traditional Chinese, Japanese, Korean and Thai.
Computer requirements:
1. Support more than 95% laptop with Intel chip (series I3 / I5 / I7), dual-core processor.
2. More memory 4G
3. You are recommended to use Lenovo ThinkPad T61, T400, T410, T420, T430, X61, X200, X201, X220, X230 2015.7 ICOM A2 + B + C compared with ICOM in BMW special function:
1. ICOM A2 modified for vehicles with OBD access receives a much more powerful processor and more storage capacity.
2. Robust aluminum case will help prevent damage during use in harsh environments.
3. To protect the MOST connector, ICOM B for vehicles as optical access will be equipped with a flexible rubber cover instead of the old plastic cap.
4. ICOM C for old series with a diagnostic socket is further provided with an approx. 20 cm of cable length, which facilitates the connection of the ICOM A2 and makes storage in easier engine compartment.
5. ICOM A2 + B + C To support BMW BMW cars until years 2013. It supports BMW and MINI complete system diagnostic and offline programming.

ICOM A2 2015.7 Wifi settings:
1. First insert the usb wifi usb port on pc
2. Disable all wifi on the PC, the PC is our usb wifi equipment. Do not connect to the network equipment or network cable.
3. More determined to do, then start the PC.
4. After starting PC vvérifier again if all wireless network are turned off and disconnected network cable.
5. Run the software and choose “WiFi for ICOM”
6. ICOM connect to the vehicle, wait 20-60 seconds, you will see the WLAN LED is not flashing or blinking slowly.


7. You can now point the diagnostic software or programming Click ok, this page can not close, only minimized.


This is from OBD2 Francais website technical support: French 2015.07V Wifi BMW ICOM A2 Diagnostic and Programming Tool – All inform here
Télécharger Gratuitement Lexia 3 DiagBox 7.82 dans le travail VMware image
Happened to find out the latest Diagbox 7.82 for Citroen and Peugeot. Put it here for you all to have a try. DIYOBD2 engineers are testing now and will report test results as soon as possible.

All Lexia 3 Diagbox versions tested & being tested:
Diagbox V7.76 Software - tested OK
Diagbpx v7.49 software - tested OK
Diagbox 7.82 - Being tested, TRY AT YOUR OWN RISK
https://mega.nz/#!Fk4AwLiR!Zp1LV7ob-TqLmgHKx_nK_tl3vC1ixKiCMLik2fM8Hv4
https://mega.nz/#!xlJ2QbrK!_ozinRJuqWcVfBiJfJ1hbqDY9T07P-UOYDTo8PHPpeM
https://mega.nz/#!NpgxyJSJ!rBeKELek8ics5rfAomyWdlYiMz8-u4qJMG55VrbVvM8
https://mega.nz/#!t1xTXbBL!tde00JbF4XX-PeD0fH2JDAGswhmMV_wvvik_UxS9Xc4
https://mega.nz/#!gwRTBSID!l-hUmpr2iSJagOzZ92OgFMmPFyFaqnsguUHsZ__IB6Q
https://mega.nz/#!l4xSkRwB!8nXnvuR2lEqHsPolDGttbrkgysz47cWxB9kikmAtDkg
https://mega.nz/#!t0YB1TSC!iTqF0U9KR1A4qNcigYG_8hup5SOHw-FayN2kzZMiQa0
https://mega.nz/#!VtAH3LDY!WuXhdZ1-zJ-rKVWzg4v8p7ODRM2NkrU4rLi37FiuVv0
https://mega.nz/#!w0pVUSJJ!rMZLwAfnHBSHv8KpwbzfcgaYoXUVIigGeLNubZlJyKo
https://mega.nz/#!so4DWZTK!TSo7Y7QSr6oKysZcpq-1tGREz_Fyj8hdbpM6R1s1n8g
https://mega.nz/#!B0Bh2S6I!wyYzKmYsJs2GiM0eB_spanrmHvoyJeM5IO4DRIrruA4
http://www.share-online.biz/dl/UW0X7S9OPB
http://www.share-online.biz/dl/TS8S3S9OW6C
http://www.share-online.biz/dl/475MZR9OAD
http://www.share-online.biz/dl/QRYFVR9OTNA
http://www.share-online.biz/dl/0B9FQR9OXQL
http://www.share-online.biz/dl/65U8MR9O9D
http://www.share-online.biz/dl/I1A2IR9OE4
http://www.share-online.biz/dl/M3OWDR9OM7G
http://www.share-online.biz/dl/UO2U9R9OBKI
http://www.share-online.biz/dl/M01X6R9OA0BZ
http://www.share-online.biz/dl/YFW04R9OID3
Note:
The tested Diagbox software is tested on Windows XP and Windows 7 operating system, runing with Chinese Lexia-3.
This is from diyobd2.fr website technical support:Free download Lexia 3 Diagbox 7.82 in working VMware Image
How to use ICOM A2 NCS Expert for BMW customer sight settings
Customer complaint:
I installed LED on my E60 Angle Lamp - and it comes out with this error:
Side/daytime lights on left faulty
Side/daytime lights on right faulty
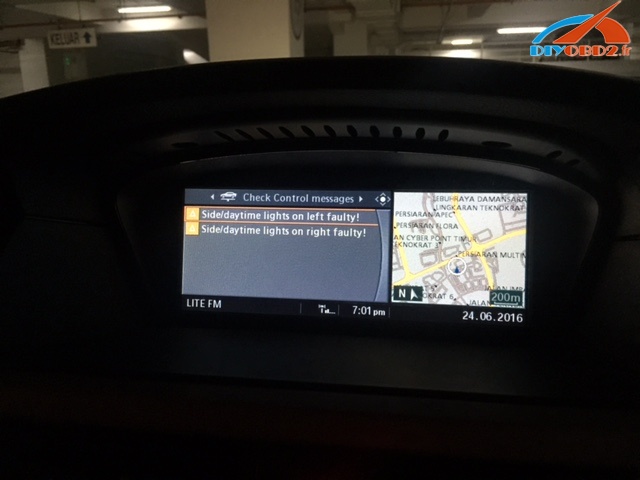
anyway to get rid of it? I have ICOM A2 emulator & ISTA.
Suggestion from diyobd2 engineers and real users:
diyobd2 engineers:
You must code LMA module with NCSexpert and NCSDummy(easier)
Turn to "nicht_aktiv" option for kalt and warm monitoring, and CC Fehler for standlicht or TFL
real users:
Here goes the dummy guide to do custom Light settings - coding E60, E63, E90 LMA module using NCS Expert
You need BMW ICOM A2 emulator with working NCS Expert
Note 1:
changes are to be made in the LMA module using NCS Expert, with the E90 you need to make these changes in the FRM module
Note 2:
some of these changes are only possible for cars with a build date after 03/2007, but you can retrofit a new module to earlier cars if you really want the features
Note 3:
I have marked the setting I used with a star =*.
Quote:
WELCOME_LIGHT_ACTIVE WELCOME LIGHTS IN LIGHTS MENU (LINKED TO [VA_WELCOMELIGHT] IN CAPPL) aktiv enabled * nicht_aktiv not enabled WL_SL_1 WELCOME LIGHTS WITH STANDING LIGHTS 1 nicht_aktiv not enabled soft_einschalten soft-on * hart_einschalten direct switch-on WL_KZL WELCOME LIGHTS WITH LICENSE PLATE LIGHTS nicht_aktiv not enabled soft_einschalten soft-on * hart_einschalten direct switch-on DEF_WELCOMELIGHT_CKM DEFAULT CAR/KEY MEMORY FOR WELCOME LIGHTS nicht_aktiv not enabled aktiv enabled * WELCOMELIGHT_CKM_0 CAR/KEY MEMORY 1 FOR WELCOME LIGHTS nicht_aktiv not enabled aktiv enabled * WELCOMELIGHT_CKM_1 CAR/KEY MEMORY 2 FOR WELCOME LIGHTS nicht_aktiv not enabled aktiv enabled * WELCOMELIGHT_CKM_2 CAR/KEY MEMORY 3 FOR WELCOME LIGHTS nicht_aktiv not enabled aktiv enabled * WELCOMELIGHT_CKM_3 CAR/KEY MEMORY 4 FOR WELCOME LIGHTS nicht_aktiv not enabled aktiv enabled * WELCOME_LIGHT_ACTIVE WELCOME LIGHTS IN LIGHTS MENU (LINKED TO [VA_WELCOMELIGHT] IN CAPPL) aktiv enabled * nicht_aktiv not enabled (Requires newer SW version in CAPPL/MASK than I had) |
Quote:
HEIMLEUCHTEN_FUNKSCHL FOLLOW-ME-HOME LIGHTS ACTIVATED BY LOCKING WITH REMOTE CONTROL nicht_aktiv not enabled aktiv enabled * Also change this parameter on CAS Module: Module: CAS: Parameter: SONDERTASTE_PANIKALARM New Value: panikalarm * (will be « nicht_aktiv » by default) |
Quote:
BFD_2_ALGORITHMUS BRAKE FORCE DISPLAY STAGE 2 ALGORITHM nicht_aktiv not enabled aktiv enabled * BFD_2_BL_M_ERSCH_BILD BRAKE FORCE DISPLAY STAGE 1 THIRD BRAKE LIGHT APPEARANCE [NICHT_AKTIV: OFF, WERT_01: ON, WERT_03: FLASHING] nicht_aktiv not enabled wert_01 value 01 wert_02 value 01 wert_03 value 03 * (flashing) |
Quote:
KLS_BEI_AL_AKTIV CORNERING LIGHTS ENABLED WHEN LIGHT SWITCH SET TO LOW BEAMS nicht_aktiv not enabled aktiv enabled * ABSTELLPOS_SMC SWITCH-OFF CORNERING LIGHTS WHEN STEERING WHEEL RETURNS (LIKE TURN SIGNALS) nicht_aktiv not enabled aktiv enabled * DEF_ABBIEGELICHT_CKM DEFAULT CAR/KEY MEMORY FOR CORNERING LIGHTS nicht_aktiv not enabled aktiv enabled * |
Angel Eyes as DRLs
Quote:
VERHALTEN_DRL_TFL_33 DAYTIME RUNNING LIGHTS drl_tfl_off daytime running lights disabled drl_s usa daytime running lights with dedicated lights drl_h usa daytime running lights with high beams drl_l usa daytime running lights with low beams tfl_s * european daytime running lights with dedicated lights DRL_TFL_SML_33 DAYTIME RUNNING LIGHTS WITH SIDE MARKER LIGHTS nicht_aktiv not enabled aktiv * enabled The DRL also needs a change in the M-ASK or CCC: DAY_RUN_LIGHT nicht_aktiv aktiv * This is from OBD2 Francais website technical support:How to use ICOM A2 NCS Expert for BMW customer sight settings |
Comment faire pour installer New Genius K-touch ECU programmeur sur Win7 / XP 32 bits
What is New Genius?
New genius k-touch map is the world's first Touch & Map device which Allows reading / programming the ECU in modern vehicles over Obd2.it can work without a computer connection Phases of reading and writing of the ECU during the critical.

New Genius OS (tested and working) and installation video demo:
New updates! Diyobd2.fr engineer verified New Genius K-touch ECU programmer is working fine with both Win7 32bit and XP 32bit. And make two video demo, one is for win7 users, and another is for old windows XP users, look at the following picture, the video is contained in the new genius DVD.
new genius Free download:
For xp: http://www.chinaautodiag.com/download/k-touch-xp-software.zip
For win7:
Firstly download http://www.chinaautodiag.com/download/k-touch-xp-software.zip
Then download application "raceloc.dll" which is used to solve the Fatal error.
http://www.chinaautodiag.com/download/raceloc.dll-for-win7-32bit.zip
1) Disable the network connection before setup k-touch.
2) Watch the video demo in the DVD especially the win7 users.
3) Ensure the k-touch driver complete setup; otherwise you may get other errors when you continue reading writing ECU data.
4) You do not need connect new genius to the computer when you read and write ECU data; just connect the device to the OBD port of Vehicle.

How to install K-touch on win7 32bit?
1) Open DVD, Install "wrar362".
2) Copy "K-touch software" folder and paste to the desktop.
3) Right click "DVD RW Drive (E :) K-touch, Eject it.
4) Install "setup 1".
Open "K-touch software" folder, select "setup1", select "fscommand" and then "Setup_RaceEVO" to install wizard, choose language (Language available: English, French, German, Italian, Portuguese (Brazil) and Spanish), then go on complete updating your system.
Continue Race EVO (rev.431 build 829) setup 1- installAware Wizard.
Note: dimensione Sport Customer code is C7535

Go on till you finish the wizard for Race EVO (rev.431 build 829) setup 1 setup, remove the tick before "Run Race EVO (rev.431 build 829) setup 1 now".

Delete "Race2000" on the desktop.
5) Install "Setup 2"
Install the extract file, after finish open the yellow icon "k-touch" on the desktop, you may come across an error message "Fatal error: Invalid version of RaceLoc.dll". Click "OK".

Generally speaking, the Fatal error working solution is: after completed setup, you need to manually replace raceloc.dll C: \ Users \ Your PC Name \ AppData \ Local \ DimWare \ RaceEVO \ 7.0.

Step-by-step to replace this file:
Open "K-touch software" folder, extract "setup3" and you will get the application file "RaceLoc.dll".
Go to C: \ Users \ Your PC Name \ AppData \ Local \ DimWare \ RaceEVO \ 7.0, find out "RaceLoc.dll" and delete it. (Note: \ AppData \ Local \ DimWare \ RaceEVO \ 7.0 may be hided, just click Organize- folder options - view and click the icon before "show hidden files, folders and drivers".

Copy the "RaceLoc.dll" from the "setup3", and then replace the deleted "RaceLoc.dll".
6) Click the yellow icon "K-touch", agree the license, click "No" to connect network.
7) Plug new genius device into the computer by following this picture, for win7, the driver will automatically complete.

Go to Device Manager to check if you can see "DimSport - New Genius Device", yes means new genius build a good communication with your computer.

8) Read and write ECU data
Open the software, click "K-Touch" - "Explore", you will see New Genius hardware version is V5.005.0003.

Read ECU data: Click "Genius: / \ File \ Read \, firstly read" DF "then save it. Then" 1015 "and" 12222 "one by one.
Write ECU data: Click "Genius: / \ File \ Write, import file" DF "," 1015 "and" 12222 "one by one and write them.
How to install K-touch on win xp 32bit?
1) Install "setup 1".
2) Open folder "K-touch software" - "setup1" - "fscommand", then "Setup_RaceEVO" to install wizard, choose language, then go on updating your system. Restart the computer according the windows requirement.

3) After restart the computer, continue updating you system, and just click next to automatically setup the required programs. Note: windows XP is slow to updating system, the poorer the computer configuration the slower the updating speed.
Note: the dimension Sport Customer code is C7535.
Finish the wizard for Race EVO (rev.431 build 829) setup 1 setup, Note: remove the tick before "Run Race EVO (rev.431 build 829) setup 1 now".
4) Delete "Race2000" on the desktop. Then install "Setup2".
7) Connect the new genius device with your computer, then setup the driver manually, after complete, go to Device Manager, you are supposed to see "DimSport - New Genius Device", it means the new genius build a good communication with your computer , otherwise you may get other errors when you read and write ECU data.
7) Now open K-touch software, agree the license, and then continue reading and writing ECU data.
Done!
Hope it is helpful.
This is from OBD2 Francais technical support website:How to install New Genius K-touch ECU programmer on Win7 / XP 32 bit
KESS V2 FW V4.036 add tokens - SUCCESS (personal experience)
I bought a KESS V2 Master Truck with K-Suite version 2.22 Firmware 4.036 online three months ago. When the tokens used up, I followed the guide video to add token and it was working. Here I will give a clear explanation of KESS token reset.
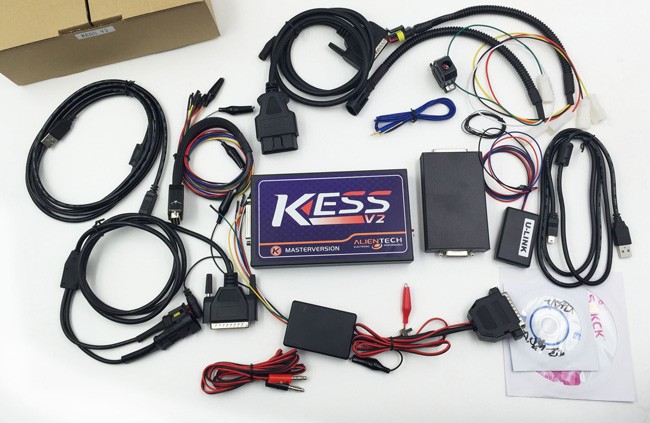
Before adding token you need download two zip files:
- KSuite-tokens.zip
- zip
After that you can start toad tokens for KESS V2 truck , I summarized following steps for your reference:
Step1. First you should check if the KESS V2 K-suite software is well installed.
Open My Computer >> Device Manager >> Universal Serial Bus Controller >> USB Device
Step2. Remember disconnect both local area network and wireless network otherwise you will damage the device.
Step3. Unzip Tool.zip file you will get 3 files: "K10033818" ECU-Tuners, "Tokens" folder and "Token1.tok", copy these 3 files to the desktop, then delete "Tool folder" and the zip file both on the desktop.
Step4. Cut KSuite-tokens.zip to local disk [C] and unzip it.
Step5. Open "K10033818" ECU-Tuners browse My Computer >> Local disk [C] >> KSuite-tokens >> KSuite. Click "OK" >> "Reset Token Count" >> "OK".
Step6. Wait for a minute, it will show KSuite is updating, after that close the KSuite interface.
Step7. Delete the "KSuite-tokens" folder in local disk [C], unzip KSuite-tokens.zip and get "KSuite-tokens" folder again.
Step8. Rename "Token1.tok" on desktop to "Token2.tok", copy "Token2.tok" to "Tokens" folder on desktop.
Step9. This step is to repeat Step5 and Step6, after that you can add tokens for KESS V2 successfully.
Also here I want to thank engineers of Www.diyobd2.fr they gave me much useful help to add token for my KESS V2.
This is from OBD2 Francais technical support website: KESS V2 FW V4.036 add tokens - SUCCESS (personal experience)
This is the video guide for KESS V2 reset token :